Search Documentation
- About
 Gallery
- Getting Started
- User Interface
- Documentation
- Path Tracing
- Headless Rendering
- Scene Format
- Minecraft Compatibility
- Plugin API
- API Docs (Currently unavailable)
- Community
- Resources
Sky Maps
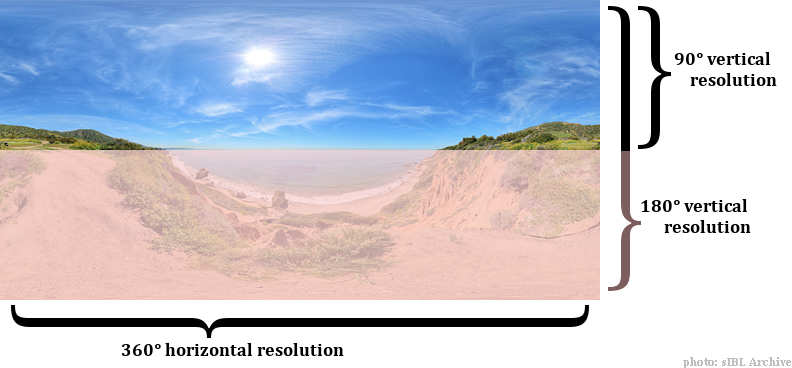
You can change the skymap under the "Sky" tab of the Render Controls dialog. There are several different types of sky map to choose from. Chunky supports a few different kinds of skymap projections, however "equirectangular" projection is the most common type of sky map.
It is recommended to use a large skymap in order to avoid the sky looking blurry. However, if the skymap is too large it will take a long time to load.
Vertical Resolution
Equirectangular skymaps can have 90° or 180° vertical resolution. With 90° vertical resolution the skymap will only cover the sky above the horizon, so it is mirrored at the horizon. If the skymap has 180° vertical resolution the mirroring is not needed: the skymap will cover both sky and ground.
Where to find skymaps
These pages provide links to other pages, or downloads of non-HDR skymaps:
HDR Skymaps
HDR skymaps have the advantage that they can be used to provide realistic outdoor lighting for a scene.
Most of these sites provide paid-for skymaps, but many of them have a few free samples available:
- CGSkies
- openfootage.net
- HDRI Haven
- nordicFX
- HDRI-Hub.com
- sIBL Archive
- hdrmaps.com
- Light probes by Bernhard Vogl
- HDRI Skies
You can also try searcing Google for Panoramic Sky Texture
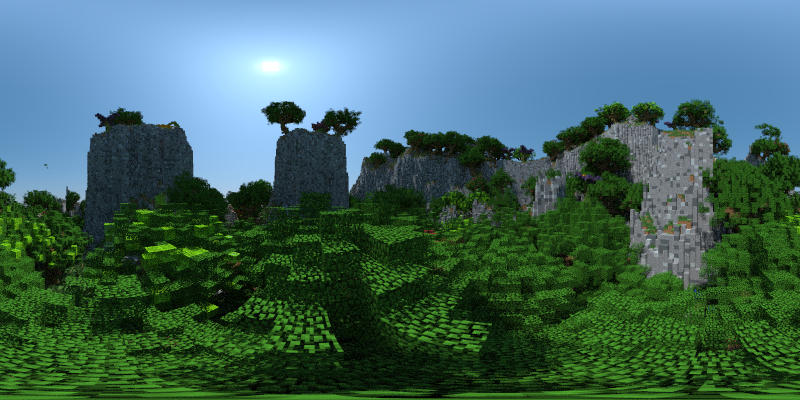
Render a Sky Map with Chunky
Chunky can be used to render a sky map. You will need to follow these steps to set up the camera correctly to render a full 180-by-360 degree sky map:
- Go to the Camera tab in the Render Controls window.
- Enter
-90into the second text field of the Direction values. - Select
Panoramic (equirectangular)from the Projection drop-down list. - Set the field of view to 180 (max out the slider).
- Go to the General tab in the Render Controls window.
- You must set the canvas width to be twice the canvas height to ensure
that the horizontal resolution is 360 degrees. This can be done by entering for
example
800x400in the canvas size text field and hittingEnter.
This shows the Camera tab with correct values entered:

And this is what the resulting render should look like: